1 Install turtlesim

As always, start by sourcing your setup files in a new terminal, as described in the previous tutorial.

sudo apt update

sudo apt install ros-humble-turtlesim

Check that the package is installed:

ros2 pkg executables turtlesim


The above command should return a list of turtlesim’s executables:

turtlesim draw_square
turtlesim mimic
turtlesim turtle_teleop_key
turtlesim turtlesim_node

2. Start turtlesim

To start turtlesim, enter the following command in your terminal:

ros2 run turtlesim turtlesim_node

3 Use turtlesim

Open a new terminal and source ROS 2 again.

Now you will run a new node to control the turtle in the first node:

ros2 run turtlesim turtle_teleop_key

4 Install rqt

sudo apt update

sudo apt install ~nros-humble-rqt*

5 Use rqt

5.1 Try the spawn service

5.2 Try the set_pen service

6 Remapping

ros2 run turtlesim turtle_teleop_key --ros-args --remap turtle1/cmd_vel:=turtle2/cmd_vel

* If you want to remap the setting in the node you can do like below :

ros2 run turtlesim turtlesim_node --ros-args --remap __node:=my_turtle \
--ros-args --remap turtle1/cmd_vel:=my_turtle/cmd_vel


* Understanding Parameters


3 ros2 param get

To display the type and current value of a parameter, use the command:

ros2 param get  

Let’s find out the current value of /turtlesim’s parameter background_g:

ros2 param get /turtlesim background_g

Which will return the value:

Integer value is: 86

4 ros2 param set

To change a parameter’s value at runtime, use the command:

ros2 param set   

Let’s change /turtlesim’s background color:

ros2 param set /turtlesim background_r 150

Your terminal should return the message:

Set parameter successful

5 ros2 param dump

You can view all of a node’s current parameter values by using the command:

ros2 param dump 

The command prints to the standard output (stdout) by default but you can also redirect the parameter values into a file to save them for later. To save your current configuration of /turtlesim’s parameters into the file turtlesim.yaml, enter the command:

ros2 param dump /turtlesim > turtlesim.yaml

You will find a new file in the current working directory your shell is running in. If you open this file, you’ll see the following content:

/turtlesim:
  ros__parameters:
    background_b: 255
    background_g: 86
    background_r: 150
    qos_overrides:
      /parameter_events:
        publisher:
          depth: 1000
          durability: volatile
          history: keep_last
          reliability: reliable
    use_sim_time: false

6 ros2 param load

You can load parameters from a file to a currently running node using the command:

ros2 param load  

To load the turtlesim.yaml file generated with ros2 param dump into /turtlesim node’s parameters, enter the command:

ros2 param load /turtlesim turtlesim.yaml

Your terminal will return the message:

Set parameter background_b successful
Set parameter background_g successful
Set parameter background_r successful
Set parameter qos_overrides./parameter_events.publisher.depth failed: parameter 'qos_overrides./parameter_events.publisher.depth' cannot be set because it is read-only
Set parameter qos_overrides./parameter_events.publisher.durability failed: parameter 'qos_overrides./parameter_events.publisher.durability' cannot be set because it is read-only
Set parameter qos_overrides./parameter_events.publisher.history failed: parameter 'qos_overrides./parameter_events.publisher.history' cannot be set because it is read-only
Set parameter qos_overrides./parameter_events.publisher.reliability failed: parameter 'qos_overrides./parameter_events.publisher.reliability' cannot be set because it is read-only
Set parameter use_sim_time successful

7 Load parameter file on node startup

To start the same node using your saved parameter values, use:

ros2 run <package_name> <executable_name> --ros-args --params-file <file_name>

This is the same command you always use to start turtlesim, with the added flags --ros-args and --params-file, followed by the file you want to load.

Stop your running turtlesim node, and try reloading it with your saved parameters, using:

ros2 run turtlesim turtlesim_node --ros-args --params-file turtlesim.yaml

The turtlesim window should appear as usual, but with the purple background you set earlier.


1. 액션 (action)

액션(action)은 그림1의 `Node A - Node B`처럼 비동기식+동기식 양방향 메시지 송수신 방식으로 액션 목표 (goal)를 지정하는 Action Client과 액션 목표를 받아 특정 태스크를 수행하면서 중간 결괏값에 해당되는 액션 피드백(feedback)과 최종 결괏값에 해당되는 액션 결과(result)를 전송하는 Action Server 간의 통신이라고 볼 수 있다. 이는 ROS 1의 액션 컨셉과 동일하다.

[그림 1: 액션 서버와 클라이언트]

추가로 액션의 구현 방식을 더 자세히 살펴보면 그림 2와 같이 토픽과 서비스의 혼합이라고 볼 수 있는데 ROS 1이 토픽만을 사용하였다면 ROS 2에서는 액션 목표, 액션 결과, 액션 피드백은 토픽과 서비스가 혼합되어 있다.

즉, 그림 2와 같이 Action Client는 Service Client 3개와 Topic Subscriber 2개로 구성되어있으며, Action Server는 Service Server 3개와 Topic Publisher 2개로 구성된다. 액션 목표/피드백/결과(goal/feedback/result) 데이터는 msg 및 srv 인터페이스[5]의 변형으로 action 인터페이스[5]라고 한다.

[그림 2: 액션 목표, 피드백, 결과]

ROS 1에서의 액션은 목표, 피드백, 결과 값을 토픽으로만 주고 받았는데 ROS 2에서는 토픽과 서비스 방식을 혼합하여 사용하였다. 그 이유로 토픽으로만 액션을 구성하였을 때 토픽의 특징인 비동기식 방식을 사용하게 되어 ROS 2 액션[10]에서 새롭게 선보이는 목표 전달(send_goal), 목표 취소 (cancel_goal), 결과 받기 (get_result)를 동기식인 서비스를 사용하기 위해서이다. 이런 비동기 방식을 이용하다보면 원하는 타이밍에 적절한 액션을 수행하기 어려운데 이를 원할히 구현하기 위하여 목표 상태(goal_state)라는 것이 ROS 2에서 새롭게 선보였다. 목표 상태는 목표 값을 전달 한 후의 상태 머신을 구동하여 액션의 프로스세를 쫒는 것이다. 여기서 말하는 상태머신은 Goal State Machine으로 그림 3과 같이 액션 목표 전달 이후의 액션의 상태 값을 액션 클라이언트에게 전달할 수 있어서 비동기, 동기 방식이 혼재된 액션의 처리를 원할하게 할 수 있게 되어 있다.

[그림 3: Goal State Machine]

출처: http://design.ros2.org/articles/actions.html

2. 액션 서버 및 클라이언트

이번 ROS 2 액션 (action) 실습에도 지난 강좌 때와 마찬가지로 turtlesim 노드와 teleop_turtle 노드를 이용하여 테스트해보겠다. 아래와 같이 두개의 노드를 각각 실행하자.

1 Setup

Start up the two turtlesim nodes, /turtlesim and /teleop_turtle.

Open a new terminal and run:

ros2 run turtlesim turtlesim_node

Open another terminal and run:

ros2 run turtlesim turtle_teleop_key

2 Use actions

When you launch the /teleop_turtle node, you will see the following message in your terminal:

Use arrow keys to move the turtle.
Use G|B|V|C|D|E|R|T keys to rotate to absolute orientations. 'F' to cancel a rotation.

Try pressing the C key, and then pressing the F key before the turtle can complete its rotation. In the terminal where the /turtlesim node is running, you will see the message:

[INFO] [turtlesim]: Rotation goal canceled

Not only can the client-side (your input in the teleop) stop a goal, but the server-side (the /turtlesim node) can as well. When the server-side chooses to stop processing a goal, it is said to “abort” the goal.

Try hitting the D key, then the G key before the first rotation can complete. In the terminal where the /turtlesim node is running, you will see the message:

[WARN] [turtlesim]: Rotation goal received before a previous goal finished. Aborting previous goal

This action server chose to abort the first goal because it got a new one. It could have chosen something else, like reject the new goal or execute the second goal after the first one finished. Don’t assume every action server will choose to abort the current goal when it gets a new one.

3 ros2 node info

To see the list of actions a node provides, /turtlesim in this case, open a new terminal and run the command:

ros2 node info /turtlesim

Which will return a list of /turtlesim’s subscribers, publishers, services, action servers and action clients:

/turtlesim
  Subscribers:
    /parameter_events: rcl_interfaces/msg/ParameterEvent
    /turtle1/cmd_vel: geometry_msgs/msg/Twist
  Publishers:
    /parameter_events: rcl_interfaces/msg/ParameterEvent
    /rosout: rcl_interfaces/msg/Log
    /turtle1/color_sensor: turtlesim/msg/Color
    /turtle1/pose: turtlesim/msg/Pose
  Service Servers:
    /clear: std_srvs/srv/Empty
    /kill: turtlesim/srv/Kill
    /reset: std_srvs/srv/Empty
    /spawn: turtlesim/srv/Spawn
    /turtle1/set_pen: turtlesim/srv/SetPen
    /turtle1/teleport_absolute: turtlesim/srv/TeleportAbsolute
    /turtle1/teleport_relative: turtlesim/srv/TeleportRelative
    /turtlesim/describe_parameters: rcl_interfaces/srv/DescribeParameters
    /turtlesim/get_parameter_types: rcl_interfaces/srv/GetParameterTypes
    /turtlesim/get_parameters: rcl_interfaces/srv/GetParameters
    /turtlesim/list_parameters: rcl_interfaces/srv/ListParameters
    /turtlesim/set_parameters: rcl_interfaces/srv/SetParameters
    /turtlesim/set_parameters_atomically: rcl_interfaces/srv/SetParametersAtomically
  Service Clients:

  Action Servers:
    /turtle1/rotate_absolute: turtlesim/action/RotateAbsolute
  Action Clients:

Notice that the /turtle1/rotate_absolute action for /turtlesim is under Action Servers. This means /turtlesim responds to and provides feedback for the /turtle1/rotate_absolute action.

The /teleop_turtle node has the name /turtle1/rotate_absolute under Action Clients meaning that it sends goals for that action name. To see that, run:

ros2 node info /teleop_turtle

Which will return:

/teleop_turtle
  Subscribers:
    /parameter_events: rcl_interfaces/msg/ParameterEvent
  Publishers:
    /parameter_events: rcl_interfaces/msg/ParameterEvent
    /rosout: rcl_interfaces/msg/Log
    /turtle1/cmd_vel: geometry_msgs/msg/Twist
  Service Servers:
    /teleop_turtle/describe_parameters: rcl_interfaces/srv/DescribeParameters
    /teleop_turtle/get_parameter_types: rcl_interfaces/srv/GetParameterTypes
    /teleop_turtle/get_parameters: rcl_interfaces/srv/GetParameters
    /teleop_turtle/list_parameters: rcl_interfaces/srv/ListParameters
    /teleop_turtle/set_parameters: rcl_interfaces/srv/SetParameters
    /teleop_turtle/set_parameters_atomically: rcl_interfaces/srv/SetParametersAtomically
  Service Clients:

  Action Servers:

  Action Clients:
    /turtle1/rotate_absolute: turtlesim/action/RotateAbsolute

4 ros2 action list

To identify all the actions in the ROS graph, run the command:

ros2 action list

Which will return:

/turtle1/rotate_absolute

This is the only action in the ROS graph right now. It controls the turtle’s rotation, as you saw earlier. You also already know that there is one action client (part of /teleop_turtle) and one action server (part of /turtlesim) for this action from using the ros2 node info <node_name> command.


4.1 ros2 action list -t

Actions have types, similar to topics and services. To find /turtle1/rotate_absolute’s type, run the command:

ros2 action list -t

Which will return:

/turtle1/rotate_absolute [turtlesim/action/RotateAbsolute]

In brackets to the right of each action name (in this case only /turtle1/rotate_absolute) is the action type, turtlesim/action/RotateAbsolute. You will need this when you want to execute an action from the command line or from code.

5 ros2 action info

You can further introspect the /turtle1/rotate_absolute action with the command:

ros2 action info /turtle1/rotate_absolute

Which will return

Action: /turtle1/rotate_absolute
Action clients: 1
    /teleop_turtle
Action servers: 1
    /turtlesim

This tells us what we learned earlier from running ros2 node info on each node: The /teleop_turtle node has an action client and the /turtlesim node has an action server for the /turtle1/rotate_absolute action.

7 ros2 action send_goal

Now let’s send an action goal from the command line with the following syntax:

ros2 action send_goal   

<values> need to be in YAML format.

Keep an eye on the turtlesim window, and enter the following command into your terminal:

ros2 action send_goal /turtle1/rotate_absolute turtlesim/action/RotateAbsolute "{theta: 1.57}"

You should see the turtle rotating, as well as the following message in your terminal:

Waiting for an action server to become available...
Sending goal:
   theta: 1.57

Goal accepted with ID: f8db8f44410849eaa93d3feb747dd444

Result:
  delta: -1.568000316619873

Goal finished with status: SUCCEEDED

All goals have a unique ID, shown in the return message. You can also see the result, a field with the name delta, which is the displacement to the starting position.

To see the feedback of this goal, add --feedback to the ros2 action send_goal command:

ros2 action send_goal /turtle1/rotate_absolute turtlesim/action/RotateAbsolute "{theta: -1.57}" --feedback

Your terminal will return the message:

Sending goal:
   theta: -1.57

Goal accepted with ID: e6092c831f994afda92f0086f220da27

Feedback:
  remaining: -3.1268222332000732

Feedback:
  remaining: -3.1108222007751465

…

Result:
  delta: 3.1200008392333984

Goal finished with status: SUCCEEDED

You will continue to receive feedback, the remaining radians, until the goal is complete.


'자동제어 > ROS2' 카테고리의 다른 글

ROS2 12장 서비스  (0) 2023.04.13
ROS2 11장 토픽  (0) 2023.04.12
리눅스 민트 설정  (0) 2023.04.11
001: ROS2 개발 환경 구축  (1) 2023.04.10

1. 서비스 (service)

서비스(service)는 그림 1의 `Node A - Node B`처럼 동기식 양방향 메시지 송수신 방식으로 서비스의 요청(Request)을 하는 쪽을 Service Client라고 하며 요청받은 서비스를 수행한 후 서비스의 응답(Response)을 하는 쪽을 Service Server라고 한다. 결국 서비스는 특정 요청을 하는 클라이언트 단과 요청받은 일을 수행 후에 결괏값을 전달하는 서버 단과의 통신이라고 볼 수 있다. 서비스 요청 및 응답(Request/Response) 또한 위에서 언급한 msg 인터페이스의 변형으로 srv 인터페이스라고 한다.

[그림 1: 서비스 통신에서의 서비스 서버와 서비스 클라이언트]

서비스는 그림 2와 같이 동일 서비스에 대해 복수의 클라이언트를 가질 수 있도록 설계되었다. 단, 서비스 응답은 서비스 요청이 있었던 서비스 클라이언트에 대해서만 응답을 하는 형태로 그림 2의 구성에서 예를 들자면 Node C의 Service Client가 Node B의 Service Server에게 서비스 요청을 하였다면 Node B의 Service Server는 요청받은 서비스를 수행한 후 Node C의 Service Client에게만 서비스 응답을 하게된다.


[그림 2: 서비스 서버와 클라이언트의 관계]

2. 서비스 목록 확인 (ros2 service list)

자~ 그럼 서비스에 대해 하나씩 알아가보자. 우선 실습을 위해 우리에게 너무나도 익숙한 turtlesim 패키지의 turtlesim_node (노드명: turtlesim)노드를 이용할 것이며 아래와 같이 실행하자.

ros2 run turtlesim turtlesim_node

그 뒤 아래와 같이 서비스 목록 확인 (ros2 service list) 명령어로 현재 실행 중인 노드들의 서비스 목록을 확인해보자.

ros2 service list /clear /kill /reset /spawn \
/turtle1/set_pen /turtle1/teleport_absolute \
/turtle1/teleport_relative /turtlesim/describe_parameters \
/turtlesim/get_parameter_types /turtlesim/get_parameters \
/turtlesim/list_parameters /turtlesim/set_parameters \
/turtlesim/set_parameters_atomically

다양한 서비스들이 포함되어 있는데 parameters 가 붙어있는 서비스는 파라미터와 관련된 내용으로 모든 노드의 기본 기능으로 포함되어 있다. 이에 대한 부분은 파라미터 강좌때 더 자세히 설명하기로 하고 오늘은 아래의 7가지 서비스에 대해 집중적으로 살펴보자.


/clear /kill /reset /spawn /turtle1/set_pen /turtle1/teleport_absolute /turtle1/teleport_relative

3. 서비스 형태 확인 (ros2 service type)

특정 서비스의 형태가 궁금하다면 서비스 형태 확인 명령어인 `ros2 service type`을 이용하면 된다. 사용 방법은 다음과 같이 명령어 뒤에 특정 서비스명을 입력하면 어떤 형태의 서비스인지 확인할 수 있다. 예를 들어 아애와 같이 clear 서비스는 std_srvs/srv/Empty 형태이고, kill 서비스는 turtlesim/srv/Kill 형태임을 확인할 수 있다.

ros2 service type /clear std_srvs/srv/Empty
ros2 service type /kill turtlesim/srv/Kill
ros2 service type /spawn turtlesim/srv/Spawn


참고로 서비스 형태 확인 명령어가 아니더라도 위에서 설명하였던 서비스 목록 확인 (ros2 service list) 명령어에 옵션으로 `-t`를 붙여주면 형태를 서비스 목록과 함께 볼 수 있다.


ros2 service list -t 
/clear [std_srvs/srv/Empty] /kill [turtlesim/srv/Kill] /reset [std_srvs/srv/Empty] 
/spawn [turtlesim/srv/Spawn] /turtle1/set_pen [turtlesim/srv/SetPen] 
/turtle1/teleport_absolute [turtlesim/srv/TeleportAbsolute] 
/turtle1/teleport_relative [turtlesim/srv/TeleportRelative] (생략)

4. 서비스 찾기 (ros2 service find)

`3. 서비스 형태 확인`에서 언급한 서비스 형태 확인 명령어와 반대로 특정 형태를 입력하면 해당 형태의 서비스를 사용하는 서비스명을 확인하는 명령어도 있다. 사용법은 아래와 같이 `ros2 service find` 명령어에 매개변수로 특정 서비스 형태를 적어주면 된다.

 ros2 service find std_srvs/srv/Empty 
 /clear 
 /reset
ros2 service find turtlesim/srv/Kill 
/kill

5. 서비스 요청 (ros2 service call)

자~ 지금까지 서비스에 대해 알아봤으니 실제 서비스 서버에게 서비스 요청(Request)을 해보도록 하자. 서비스 요청은 다음과 같이 `ros2 service call` 명령어를 이용하며 매개 변수로 서비스명, 서비스 형태, 서비스 요청 내용을 기술하면 된다.

ros2 service call <service_name> <service_type> "<arguments>"

첫번째로 다룰 서비스는 /clear 서비스로 turtlesim 노드를 동작할 때 표시되는 이동 궤적을 지우는 서비스이다. 이를 확인하기 위해서는 아래와 같이 teleop_turtle 노드를 실행시켜서 그림 3처럼 미리 실행시켜둔 turtlesim을 움직여보자.

ros2 run turtlesim turtle_teleop_key

[그림 3: 거북이의 이동 궤적]

그 뒤 아래의 명령어로 /clear 서비스를 요청해보자. 그림 3의 이동 궤적이 서비스 요청 후에는 그림 4처럼 모두 지워짐을 확인할 수 있다. 아래 명령어에서 "<arguments>" 가 생략되었는데 이는 std_srvs/srv/Empty 이라는 서비스 형태가 아무런 내용이 없는 형태로 사용할 수 있기 때문이다.

ros2 service call /clear std_srvs/srv/Empty 
requester: making request: std_srvs.srv.Empty_Request() 
response: std_srvs.srv.Empty_Response()


[그림 4: 이동 궤적이 지워진 모습]

이번에는 /kill 서비스를 요청해보자. /kill 서비스는 죽이고자하는 거북이 이름을 서비스 요청의 내용으로 입력하면되는데 아래과 같이 turtle1이라고 이름을 지정하면 그림 5와 같이 거북이가 사라졌음을 확인할 수 있다.

ros2 service call /kill turtlesim/srv/Kill "name: 'turtle1'" 
requester: making request: turtlesim.srv.Kill_Request(name='turtle1') 
response: turtlesim.srv.Kill_Response()

[그림 5: kill 서비스에 의해 거북이가 사라진 모습]

이번에는 /reset 서비스를 요청해보자. 이 서비스는 그림 6과 같이 모든 것이 리셋이 되면서 없어졌던 거북이가 다시 등장하거나 이동한 후에 모든 궤적도 사라지고 원점에 재위치 시킨다는 것을 확인할 수 있다.

ros2 service call /reset std_srvs/srv/Empty 
requester: making request: std_srvs.srv.Empty_Request() 
response: std_srvs.srv.Empty_Response()

[그림 6: 리셋된 모습]

이번에는 /set_pen 서비스를 요청해보자. 이 서비스는 지정한 거북이의 궤적 색과 크기를 변경하는 것으로 아래와 같이 r, g, b 값을 조합하여 색을 지정하고, width로 궤적의 크기를 지정할 수 있다. 이를 여러번 값을 변경해보며 테스트하면 그림 7과 같다.

ros2 service call /turtle1/set_pen turtlesim/srv/SetPen "{r: 255, g: 255, b: 255, width: 10}" 
requester: making request: turtlesim.srv.SetPen_Request(r=255, g=255, b=255, width=10, off=0) 
response: turtlesim.srv.SetPen_Response()

[그림 7: 이동 궤적의 색상 및 크기를 변경해본 모습]

마지막으로 /spawn 서비스를 요청해보자. 이 서비스는 지정한 위치 및 자세에 지정한 이름으로 거북이를 추가시키게된다. 이름은 옵션으로 지정하지 않으면 turtle2처럼 자동으로 지정되며 동일한 이름을 사용할 수는 없다.

아래 예제에서는 기본으로 지정된 turtle1을 /kill 서비스를 이용해 없애고 닌자거북이 4총사인 leonardo, raffaello, michelangelo, donatello를 생성한 모습이다. 이를 수행하면 그림 8과 같이 4마리의 거북이를 볼 수 있다.

ros2 service call /kill turtlesim/srv/Kill "name: 'turtle1'"
requester: making request: turtlesim.srv.Kill_Request(name='turtle1')
response:
turtlesim.srv.Kill_Response()

ros2 service call /spawn turtlesim/srv/Spawn "{x: 5.5, y: 9, theta: 1.57, name: 'leonardo'}"
requester: making request: turtlesim.srv.Spawn_Request(x=5.5, y=9.0, theta=1.57, name='leonardo')
response:
turtlesim.srv.Spawn_Response(name='leonardo')

ros2 service call /spawn turtlesim/srv/Spawn "{x: 5.5, y: 7, theta: 1.57, name: 'raffaello'}"
requester: making request: turtlesim.srv.Spawn_Request(x=5.5, y=7.0, theta=1.57, name='raffaello')
response:
turtlesim.srv.Spawn_Response(name='raffaello')

ros2 service call /spawn turtlesim/srv/Spawn "{x: 5.5, y: 5, theta: 1.57, name: 'michelangelo'}"
requester: making request: turtlesim.srv.Spawn_Request(x=5.5, y=5.0, theta=1.57, name='michelangelo')
response:
turtlesim.srv.Spawn_Response(name='michelangelo')

ros2 service call /spawn turtlesim/srv/Spawn "{x: 5.5, y: 3, theta: 1.57, name: 'donatello'}"
requester: making request: turtlesim.srv.Spawn_Request(x=5.5, y=3.0, theta=1.57, name='donatello')
response:
turtlesim.srv.Spawn_Response(name='donatello')

[그림 8: 닌자 거북이 4총사]

ros2 topic list /donatello/cmd_vel /donatello/color_sensor \
/donatello/pose /leonardo/cmd_vel /leonardo/color_sensor \
/leonardo/pose /michelangelo/cmd_vel /michelangelo/color_sensor \
/michelangelo/pose /new_turtle/cmd_vel /new_turtle/pose /parameter_events \
/raffaello/cmd_vel /raffaello/color_sensor /raffaello/pose /rosout /turtle1/cmd_vel \
/turtle1/color_sensor /turtle1/pose /turtle2/cmd_vel /turtle2/pose /turtle3/cmd_vel \
/turtle3/color_sensor /turtle4/cmd_vel /turtle4/color_sensor /turtle4/pose

6. 서비스 인터페이스 (service interface, srv)

`009 ROS 2 토픽 (topic)`[3] 강좌에서는 메시지 인터페이스(message interface, msg)에 대해 알아보았다. 서비스 또한 토픽과 마찬가지로 별도의 인터페이스를 가지고 있는데 이를 서비스 인터페이스라 부르며, 파일로는 srv 파일을 가르킨다. 서비스 인터페이스는 메시지 인터페이스의 확장형이라고 볼 수 있는데 위에서 서비스 요청때 실습으로 사용하였던 /spawn 서비스를 예를 들어 설명하겠다.

/spawn 서비스에 사용된 Spawn.srv 인터페이스를 알아보기 위해서는 [7]의 원본 파일을 참고해도 되고, `ros2 interface show` 명령어를 이용하여 확인할 수 있다. 이 명령어를 이용하면 아래의 결괏값과 같이 `turtlesim/srv/Spawn.srv`은 float32 형태의 x, y, theta 그리고 string 형태로 name 이라고 두개의 데이터가 있음을 알 수 있다. 여기서 특이한 것은 `---` 이다. 이는 구분자라 부른다. 서비스 인터페이스는 메시지 인터페이스와는 달리 서비스 요청 및 응답(Request/Response) 형태로 구분되는데 요청(Request)과 응답(Response)을 나누어 사용하기 위해서 `---`를 사용하게 된다. 즉 x, y, theta, name 은 서비스 요청에 해당되고 서비스 클라이언트 단에서 서비스 서버단에 전송하는 값이 된다. 그리고 서비스 서버단은 지정된 서비스를 수행하고 name 데이터를 서비스 클라이언트단에 전송하게 된다.

ros2 interface show turtlesim/srv/Spawn
float32 x 
float32 y 
float32 theta 
string name 
--- 
string name

실제로 우리는 /spawn 서비스를 사용할 때 신규 거북이를 생성하기 위하여 x, y, theta 로 위치와 자세를 지정하고, name에 신규 거북이의 이름을 지정하였다. 그 뒤 거북이가 추가되면서 추가된 거북이의 이름을 반환 받았었다.

자! 이제 서비스에 대해 알아봤고 다음 강좌에서는 액션에 대해 알아보자.

[참고 자료]

[1] 로봇 운영체제 ROS 강좌 목차: https://cafe.naver.com/openrt/24070

[2] ROS 2 노드와 메시지 통신, https://cafe.naver.com/openrt/24086

[3] 009 ROS 2 토픽 (topic), https://cafe.naver.com/openrt/24101

[4] https://index.ros.org/doc/ros2/Tutorials/

[5] https://index.ros.org/doc/ros2/Tutorials/Services/Understanding-ROS2-Services/

[6] https://index.ros.org/doc/ros2/Concepts/About-ROS-Interfaces/

[7] https://github.com/ros/ros_tutorials/blob/foxy-devel/turtlesim/srv/Spawn.srv

'자동제어 > ROS2' 카테고리의 다른 글

ROS2 13장 액션(action)  (0) 2023.04.13
ROS2 11장 토픽  (0) 2023.04.12
리눅스 민트 설정  (0) 2023.04.11
001: ROS2 개발 환경 구축  (1) 2023.04.10

1. 토픽 (topic)

토픽(topic)은 그림 1의 `Node A - Node B`처럼 비동기식 단방향 메시지 송수신 방식으로 msg 메시지 형태의 메시지를 발행하는 `Publisher`와 메시지를 구독하는 `Subscriber` 간의 통신이라고 볼 수 있다. 이는 1:1 통신을 기본으로 하지만 그림 2의 `Node A - Node B`, `Node A - Node C`와 같이 하나의 토픽(예: Topic C)을 송수신하는 1:N도 가능하고 그 구성 방식에 따라 N:1, N:N 통신도 가능하며 ROS 메시지 통신에서 가장 널리 사용되는 통신 방법이다.

그리고 그림 2의 `Node A`처럼 하나의 이상의 토픽을 발행할 수 있을 뿐만이 아니라 `Publisher` 기능과 동시에 토픽(예: Topic D)을 구독하는 `Subscriber` 역할도 동시에 수행할 수 있다. 원한다면 자신이 발행한 토픽을 셀프 구독할 수 있게 구성할 수도 있다. 이처럼 토픽 기능은 목적에 따라 다양한 방법으로 사용할 수 있는데 이러한 유연성으로 다양한 곳에 사용중에 있다. 경험상 ROS 프로그래밍시에 70% 이상이 토픽으로 사용될 정도로 통신 방식 중에 가장 기본이 되며 가장 널리쓰이는 방법이다. 기본 특징으로 비동기성과 연속성을 가지기에 센서 값 전송 및 항시 정보를 주고 받아야하는 부분에 주로 사용된다.

8. 토픽 발행 (ros2 topic pub)

토픽의 발행(publish)은 ROS 프로그램에 내장하는게 기본이다. 이는 ROS 프로그래밍 시간에 다루도록 하고 여기서는 `ros2 topic pub` 명령어를 통해 간단히 토픽을 발행하는 테스트를 해보자. 이 명령어의 사용은 다음과 같다. `ros2 topic pub` 명령어에 토픽 이름, 토픽 메시지 타입, 메시지 내용을 기술하면 된다.

ros2 topic pub <topic_name> <msg_type> "<args>"

즉, 아래와 같이 기술하면 되는데 아래 명령어를 풀어 해석하자면 `--once` 옵션을 사용하여 단 한번의 발행만을 수행하도록 하였으며, 토픽 이름으로는 /turtle1/cmd_vel 을 사용하였고, 토픽 메시지 타입은 geometry_msgs/msg/Twist 을 사용하였다. 메시지 내용으로는 병진 속도 linear.x 값으로 2.0 m/s를 넣었고, 회전 속도 angular.z 값으로 1.8 rad/s를 입력하였다.

$ ros2 topic pub --once /turtle1/cmd_vel geometry_msgs/msg/Twist \
"{linear: {x: 2.0, y: 0.0, z: 0.0}, angular: {x: 0.0, y: 0.0, z: 1.8}}"

지속적인 발행을 원한다면 `--once` 옵션 제거하고 대신 `--rate 1` 옵션처럼 주기 1Hz의 발행도 할 수 있다. 이를 사용하면 그림 9와 같이 동작할 것이다.

$ ros2 topic pub --rate 1 /turtle1/cmd_vel geometry_msgs/msg/Twist \
"{linear: {x: 2.0, y: 0.0, z: 0.0}, angular: {x: 0.0, y: 0.0, z: 1.8}}"

* Remapping

ros2 run turtlesim turtle_teleop_key --ros-args --remap turtle1/cmd_vel:=turtle2/cmd_vel
ros2 run turtlesim turtlesim_node --ros-args --remap __node:=my_turtle

9. bag 기록 (ros2 bag record)

ROS에는 발행하는 토픽을 파일 형태로 저장하고 필요할 때 저장된 토픽을 다시 불러와 동일 타이밍으로 재생할 수 있는 기능이 있다. 이를 rosbag이라고 한다. 이는 매우 유용한 ROS의 기능으로 디버깅에 큰 도움을 준다.

예를 들어 내가 SLAM 알고리즘을 개발한다면 알고리즘 개발에 집중하기 위해서는 SLAM에 필요한 라이다와 같은 센서 정보와 로봇의 위치 정보인 오도메트리와 같은 상태 정보가 필요한데 매번 로봇을 구동시켜 데이터를 취득하기도 힘들고 데이터 취득을 매번하여 테스트를 하더라도 센서 정보 및 로봇 상태 값에 따라 결괏값이 상이해져 알고리즘이 좋아진 것인지 테스트할 때 운이 좋게 센서 및 로봇 상태 값이 좋았는지 구분하기 어렵다. 이럴 때에는 알고리즘의 입력 값을 고정하고 반복하여 테스트할 수 있다면 알고리즘만의 개선 작업 및 성능 검증 테스트를 할 수 있게 된다. rosbag은 이러한 상황에서 원하는 토픽을 기록하고 재생하는 도구이다.

rosbag은 다음과 같이 bag 기록 (ros2 bag record) 명령어에 내가 기록하고자 하는 토픽 이름을 기재하면 된다. 예를 들어 /turtle1/cmd_vel 토픽을 기록하려면 다음 명령어와 같이 실행해주면 된다. 기록 종료는 프로그램을 종료하면 되는데 일반적인 노드 종료와 마찬가지로 해당 터미널 창에서 `Ctrl + c`를 눌러주면 된다. 기록이 종료되면 `rosbag2_2020_09_04-08_31_06` 이라는 이름으로 폴더가 생성된다. 참고로 원하는 이름이 별도로 있다면 `ros2 bag record -o 이름 /turtle1/cmd_vel` 과 같이 `-o` (output) 옵션을 이용하여 특정 이름을 지정해도 된다.

ros2 bag record <topic_name1> <topic_name2> <topic_name3>

ros2 bag record /turtle1/cmd_vel
[INFO]: Opened database 'rosbag2_2020_09_04-08_31_06'.
[INFO]: Listening for topics...
[INFO]: Subscribed to topic '/turtle1/cmd_vel'

10. bag 정보 (ros2 bag info)

저장된 rosbag 파일의 정보를 확인하려면 아래 예제와 같이 bag 정보 (ros2 bag info) 명령어를 이용하면 된다. 내용을 살펴보면 방금 전 우리가 기록한 이 rosbag 파일은 84.4 KiB 크기에 31.602s 시간 동안 기록되었고, 기록이 언제 시작되고 언제 끝났는지 타임스태프와 취득한 토픽의 이름 메시지 형태 메시지 별 갯수와 총 갯수 등이 기록되어 있다.

$ ros2 bag info rosbag2_2020_09_04-08_31_06/

Files:             rosbag2_2020_09_04-08_31_06.db3
Bag size:          84.4 KiB
Storage id:        sqlite3
Duration:          31.602s
Start:             Sep  4 2020 08:31:09.952 (1599175869.952)
End                Sep  4 2020 08:31:41.554 (1599175901.554)
Messages:          355
Topic information: Topic: /turtle1/cmd_vel | Type: geometry_msgs/msg/Twist | Count: 355 | Serialization Format: cdr

11. bag 재생 (ros2 bag play)

rosbag 파일을 기록하고 정보를 확인해봤으니 이제는 재생을 해보자. 일단 turtlesim 노드를 종료한 후 다시 시작하여 초기화를 해준 후 아래의 예제처럼 rosbag를 재생하면 기록 시간 타이밍에 따라 토픽이 재생됨을 확인할 수 있다. 이는 위에서 설명한 `ros2 topic echo /turtle1/cmd_vel` 명령어를 이용하여 터미널 창에서 학인해도 되고, 그림 11와 같이 turtlesim 노드위의 거북이의 움직임을 비교해도 된다.

ros2 bag play rosbag2_2020_09_04-08_31_06/
[INFO]: Opened database 'rosbag2_2020_09_04-08_31_06/'.


13. 메시지 인터페이스 (message interface, msg)

지금까지 우리가 다루었던 그림 12의 /turtle1/cmd_vel 토픽은 geometry_msgs/msgs/Twist 형태이다. 이름이 좀 긴데 풀어서 설명하면 기하학 관련 메시지를 모아둔 geometry_msgs 패키지의 msgs 분류의 Twist 데이터 형태라는 것이다.

Twist 데이터 형태를 자세히 보면 Vector3 linear과 Vector3 angular 이라고 되어 있다. 이는 메시지 안에 메시지를 품고 있는 것으로 Vector3 형태에 linear 이라는 이름의 메시지와 Vector3 형태에 angular 이라는 이름의 메시지, 즉 2개의 메시지가 있다는 것이며 Vector3는 다시 float64 형태에 x, y, z 값이 존재한다.

다시 말해 geometry_msgs/msgs/Twist 메시지 형태는 float64 자료형의 linear.x, linear.y, linear.z, angular.x, angular.y, angular.z 라는 이름의 메시지인 것이다. 이를 통해 병진 속도 3개, 회전 속도 3개를 표현할 수 있게 된다.


'자동제어 > ROS2' 카테고리의 다른 글

ROS2 13장 액션(action)  (0) 2023.04.13
ROS2 12장 서비스  (0) 2023.04.13
리눅스 민트 설정  (0) 2023.04.11
001: ROS2 개발 환경 구축  (1) 2023.04.10

1. 무선 랜카드 설정

- Driver for the Realtek RTL8812BU and RTL8822BU WiFi chipsets

1) reboot and disable Secure Boot in the BIOS. In order to do this, you might need to set an administrator password in the BIOS first.

2) Then execute the following terminal commands

sudo apt-get update
sudo apt-get install dkms git build-essential
mkdir -p ~/src
cd ~/src
git clone https://github.com/morrownr/88x2bu-20210702.git
cd ~/src/88x2bu-20210702
sudo ./install-driver.sh

3. Reboot and test

2. 미러 서버 변경

- Change Ubuntu Repository Mirror Sources

sudo nano /etc/apt/sources.list


'자동제어 > ROS2' 카테고리의 다른 글

ROS2 13장 액션(action)  (0) 2023.04.13
ROS2 12장 서비스  (0) 2023.04.13
ROS2 11장 토픽  (0) 2023.04.12
001: ROS2 개발 환경 구축  (1) 2023.04.10

1. 개발 환경

이번 ROS 2 강좌는 리눅스 민트 20.x를 기본 운영 체제로 사용하고, ROS는 ROS 2 Humble Hawksbill 을 사용하도록 한다. 그 이외에 개발 환경은 다음과 같다. 이는 최저 사양이고 이 이상의 버전을 사용하는 경우도 있음을 미리 밝혀둔다. ROS 2 릴리즈별 정보 및 개발 환경에 대한 더 자세한 내용은 참고 자료 [4]를 참고하도록 하자.

구분
추천
 
기본 운영 체제
Linux Mint 21.1
 
로봇 운영 체제
ROS 2 Humble Hawksbill
 
컴퓨터 아키텍처
amd64
 
통합 개발 환경 (IDE)
Visual Studio Code
 
프로그래밍 언어
Python 3 (3.8.0), C++ 14
 
시뮬레이터
Gazebo 11.x
 
DDS
Fast DDS
 
기타
CMake 3.16.3, Qt 5.12.5, OpenCV 4.2.0


참고설명

리눅스를 설치할 때 기본 언어를 한글로 설치하는 분들이 있는데 `English`로 설치 하시기를 강력히 추천한다. 한글로 설치하면 터미널에서 명령어를 이용할 때와 빌드할 때 한글로 에러가 표시된다. 그러면 구글링 이나 stackoverflow 에서 답변 검색할 때 당혹감을 감출 수 없을 것이다. 꼭 `English`로 설치하자.

참고설명

ROS가 다양한 운영체제와 도커 개발 환경을 지원하고 있지만 개발 환경의 기본은 리눅스 환경이다. macOS, Windows에서 개발하는 것은 가능은 하지만 처음 ROS를 사용하고 익히는 입장이라면 아무래도 가장 많은 개발자 및 유저들이 사용하는 리눅스 환경이 안정적이고 문제가 적다. 그리고 가상머신 및 도커를 이용한 컨테이너 이용은 리소스적인 면과 디바이스 연결면에서 개인적으로 추천하지 않는다.

3. 로봇 운영 체제 설치

ROS 2 Humble Hawksbill 설치 방법에는 1) 소스 빌드[7], 2) 미리 빌드된 파일 사용[8], 3) 데비안 패키지 사용[9]과 같이 3가지 방법이 있다. 제일 간단한 방법은 데비안 패키지를 이용하는 것으로 업데이트가 비교적 간단하기에 이 방법을 추천한다. 설치는 아래 링크의 공식 설치 메뉴얼대로 설치해도 되는데 이 강좌에는 이를 요약하여 명령어만 나열하여 기록해두니 참고하도록 하자.


1) 지역 설정

sudo apt update && sudo apt install locales
sudo locale-gen en_US en_US.UTF-8
sudo update-locale LC_ALL=en_US.UTF-8 LANG=en_US.UTF-8
export LANG=en_US.UTF-8

2) 소스 설정

sudo apt install software-properties-common
sudo add-apt-repository universe
sudo apt update && sudo apt install curl -y
sudo curl -sSL https://raw.githubusercontent.com/ros/rosdistro/master/ros.key -o /usr/share/keyrings/ros-archive-keyring.gpg
echo "deb [arch=$(dpkg --print-architecture) signed-by=/usr/share/keyrings/ros-archive-keyring.gpg] http://packages.ros.org/ros2/ubuntu $(. /etc/os-release && echo $UBUNTU_CODENAME) main" | sudo tee /etc/apt/sources.list.d/ros2.list > /dev/null


3) Install development tools and ROS tools

 (1) Install common packages

sudo apt update && sudo apt install -y \
  python3-flake8-docstrings \
  python3-pip \
  python3-pytest-cov \
  ros-dev-tools

 (2) Install packages according to your Ubuntu version.

sudo apt install -y \
   python3-flake8-blind-except \
   python3-flake8-builtins \
   python3-flake8-class-newline \
   python3-flake8-comprehensions \
   python3-flake8-deprecated \
   python3-flake8-import-order \
   python3-flake8-quotes \
   python3-pytest-repeat \
   python3-pytest-rerunfailures


4) ROS 2 패키지 설치

sudo apt update
sudo apt upgrade
# ros2 humble desktop 설치 오류 시 여러번 재 입력하면 정상 설치
sudo apt install ros-humble-desktop 
sudo apt install ros-humble-ros-base
sudo apt install ros-dev-tools

5) ROS 2 패키지 설치 확인

문제없이 설치되었다면 하기와 같이 두 터미널 창에서 ROS 2의 기본적인 퍼블리시와 서브스크라이브 동작을 확인 가능하다.

source /opt/ros/humble/setup.bash
ros2 run demo_nodes_cpp talker 
[INFO] [1612912263.574031946] [talker]: Publishing: 'Hello World: 1' 
[INFO] [1612912264.574010597] [talker]: Publishing: 'Hello World: 2' 
[INFO] [1612912265.574381893] [talker]: Publishing: 'Hello World: 3' 
[INFO] [1612912266.574508130] [talker]: Publishing: 'Hello World: 4' 
[INFO] [1612912267.574615200] [talker]: Publishing: 'Hello World: 5' 
[INFO] [1612912268.574767202] [talker]: Publishing: 'Hello World: 6' 
[INFO] [1612912269.574953419] [talker]: Publishing: 'Hello World: 7' ...
source /opt/ros/humble/setup.bash
ros2 run demo_nodes_py listener 
[INFO] [1612912265.593335793] [listener]: I heard: [Hello World: 3] 
[INFO] [1612912266.576514520] [listener]: I heard: [Hello World: 4] 
[INFO] [1612912267.576780341] [listener]: I heard: [Hello World: 5] 
[INFO] [1612912268.576769156] [listener]: I heard: [Hello World: 6] 
[INFO] [1612912269.577142775] [listener]: I heard: [Hello World: 7] ...

4. ROS 개발 툴 설치

하기의 소프트웨어는 ROS 2를 이용한 로봇 프로그래밍에 필수인 소프트웨어 모음이다. 개발 환경 설치시에 반드시 미리 설치해두도록 하자.

sudo apt update && sudo apt install -y build-essential cmake git libbullet-dev python3-colcon-common-extensions python3-flake8 python3-pip python3-pytest-cov python3-rosdep python3-setuptools python3-vcstool wget
python3 -m pip install -U  argcomplete  flake8-blind-except  flake8-builtins  flake8-class-newline  flake8-comprehensions  flake8-deprecated  flake8-docstrings  flake8-import-order flake8-quotes  pytest-repeat  pytest-rerunfailures  pytest
sudo apt install --no-install-recommends -y libasio-dev libtinyxml2-dev libcunit1-dev

5. ROS 2 빌드 테스트

ROS 2 Humble Hawsbill 설치를 마쳤으면 하기와 같이 'robot_ws' 이라는 이름으로 워크스페이스 폴더를 생성한 후 빌드를 해보자. 참고로 'robot_ws' 이름 대신에 원하는 이름이 있다면 마음껏 변경이 가능하고 아래 빌드는 워크스페이스에 패키지가 하나도 없기에 무엇인가를 빌드하는 것이 아닌 환경 셋팅을 하고 ROS 2 설치가 잘 되어 빌드에 문제가 없는지 알아보는 과정이다.

source /opt/ros/humble/setup.bash
mkdir -p ~/robot_ws/src
cd ~/robot_ws/
# 아래 코드는 ros2 humble install instruction(Get ROS 2 code)
vcs import --input https://raw.githubusercontent.com/ros2/ros2/humble/ros2.repos src
colcon build --symlink-install

위 과정대로 진행하여 환경 설정 및 빌드에 문제가 없었다면 워크스페이스 폴더의 하위 폴더로 src 이외에도 build, install, log 폴더가 생성되는 것을 확인할 수 있을 것이다.

​Install dependencies using rosdep

- ROS 2 packages are built on frequently updated Ubuntu systems. It is always recommended that you ensure your system is up to date before installing new packages.

sudo apt upgrade
sudo rosdep init
rosdep update
rosdep install --from-paths src --ignore-src -y --skip-keys "fastcdr rti-connext-dds-6.0.1 urdfdom_headers"

​- Note: If you’re using a distribution that is based on Ubuntu (like Linux Mint) but does not identify itself as such, you’ll get an error message like Unsupported OS [mint]. In this case append --os=ubuntu:jammy to the above command.

6. Run commands 설정

위 `3. 로봇 운영 체제 설치`에서 `ROS 2` 설치 이후에 `source /opt/ros/humble/setup.bash` 를 설정 한 후, talker 노드 및 listener 노드를 실행하였는데 `source /opt/ros/humble/setup.bash` 와 같은 환경 설정을 매번 불러오기란 매우 귀찮을 수 있다. 이에 하기와 같이 Run commands(rc)를 모아두는 bashrc 파일에 많이 사용되는 alias, source, export 을 설정해두면 ROS 2 개발 및 사용에 있어서 매우 편리하다.

nano ~/.bashrc 
# OR
vim ~/.bashrc 
# OR
xed ~/.bashrc

bashrc 파일을 편집할 때에는 nano, vim, xed 등 원하는 편집기를 사용하면 되고 bashrc 파일의 기존 내용은 그대로 두고 맨 아래에 하기 설정들을 추가해주면 된다.

source /opt/ros/humble/setup.bash
source ~/robot_ws/install/local_setup.bash

source /usr/share/colcon_argcomplete/hook/colcon-argcomplete.bash
source /usr/share/vcstool-completion/vcs.bash
source /usr/share/colcon_cd/function/colcon_cd.sh
export _colcon_cd_root=~/robot_ws

export ROS_DOMAIN_ID=7
export ROS_NAMESPACE=robot1

export RMW_IMPLEMENTATION=rmw_fastrtps_cpp
# export RMW_IMPLEMENTATION=rmw_connext_cpp
# export RMW_IMPLEMENTATION=rmw_cyclonedds_cpp
# export RMW_IMPLEMENTATION=rmw_gurumdds_cpp

# export RCUTILS_CONSOLE_OUTPUT_FORMAT='[{severity} {time}] [{name}]: {message} ({function_name}() at {file_name}:{line_number})'
export RCUTILS_CONSOLE_OUTPUT_FORMAT='[{severity}]: {message}'
export RCUTILS_COLORIZED_OUTPUT=1
export RCUTILS_LOGGING_USE_STDOUT=0
export RCUTILS_LOGGING_BUFFERED_STREAM=1

alias cw='cd ~/robot_ws'
alias cs='cd ~/robot_ws/src'
alias ccd='colcon_cd'

alias eb='gedit ~/.bashrc'
alias sb='source ~/.bashrc'

alias roshumble='source /opt/ros/humble/setup.bash && source ~/gcamp_ros2_ws/install/local_setup.bash'


alias cb='cd ~/robot_ws && colcon build --symlink-install'
alias cbs='colcon build --symlink-install'
alias cbp='colcon build --symlink-install --packages-select'
alias cbu='colcon build --symlink-install --packages-up-to'
alias ct='colcon test'
alias ctp='colcon test --packages-select'
alias ctr='colcon test-result'

alias rt='ros2 topic list'
alias re='ros2 topic echo'
alias rn='ros2 node list'

alias killgazebo='killall -9 gazebo & killall -9 gzserver  & killall -9 gzclient'

alias af='ament_flake8'
alias ac='ament_cpplint'

alias testpub='ros2 run demo_nodes_cpp talker'
alias testsub='ros2 run demo_nodes_cpp listener'
alias testpubimg='ros2 run image_tools cam2image'
alias testsubimg='ros2 run image_tools showimage'

설정들을 추가해 준 후, 터미널을 껏다 켜고 alias 로 설정해둔 cb를 이용해 워크스페이스에 colcon을 통한 빌드를 진행한다.


Summary: 343 packages finished [30min 4s]
  97 packages had stderr output: action_tutorials_py ament_clang_format ament_clang_tidy ament_copyright ament_cppcheck ament_cpplint ament_flake8 ament_index_python ament_lint ament_lint_cmake ament_mypy ament_package ament_pclint ament_pep257 ament_pycodestyle ament_pyflakes ament_uncrustify ament_xmllint demo_nodes_py domain_coordinator examples_rclpy_executors examples_rclpy_guard_conditions examples_rclpy_minimal_action_client examples_rclpy_minimal_action_server examples_rclpy_minimal_client examples_rclpy_minimal_publisher examples_rclpy_minimal_service examples_rclpy_minimal_subscriber examples_rclpy_pointcloud_publisher examples_tf2_py google_benchmark_vendor iceoryx_posh launch launch_pytest launch_ros launch_testing launch_testing_examples launch_testing_ros launch_xml launch_yaml libyaml_vendor lifecycle_py mimick_vendor osrf_pycommon qt_gui_cpp quality_of_service_demo_py rmw_connextdds_common ros2action ros2bag ros2cli ros2component ros2doctor ros2interface ros2launch ros2lifecycle ros2multicast ros2node ros2param ros2pkg ros2run ros2service ros2test ros2topic ros2trace rosidl_cli rosidl_runtime_py rpyutils rqt rqt_action rqt_bag rqt_bag_plugins rqt_console rqt_graph rqt_gui rqt_gui_py rqt_msg rqt_plot rqt_publisher rqt_py_console rqt_reconfigure rqt_service_caller rqt_shell rqt_srv rqt_topic rti_connext_dds_cmake_module sensor_msgs_py sros2 test_launch_ros test_tracetools_launch tf2_ros_py tf2_tools topic_monitor tracetools_launch tracetools_read tracetools_test tracetools_trace zstd_vendor


7. 통합 개발 환경 (IDE) 설치

ROS 2 개발 환경에서 IDE는 Visual Studio Code (이하 VSCode)를 추천한다. VSCode는 Linux, Windows, macOS와 같이 다양한 운영체제를 지원하는 크로스 플랫폼 에디터이고 다양한 프로그래밍 언어를 지원하고 있다. 그리고 32비트 계열은 물론 amd64, arm64를 지원하고 있어서 ARM 계열의 임베디드 보드에서도 사용 가능하다. 더불어 텍스트 에디터 형태로 매우 가벼우면서 IntelliSense와 Git 기능과 같은 다양한 기능을 확장(extension) 기능으로 제공하고 있다. ROS를 지원하는 IDE 중 한가지를 더 추천하자면 QtCreator이다. QtCreator는 ROS 2의 RQt의 Plugin 개발에 UI 작성할 때 편리하기에 서브로 사용하면 좋을 듯싶다.

7.1 Visual Studio Code

이하 내용은 ROS 2 개발 환경 구축을 위한 IDE 설정 및 사용법으로 VSCode의 설치, 실행, 확장 기능 설치, 개발 환경 설정을 다룬다. 특히 프로그래밍 개발에는 프로그래밍 언어별 소스 코드의 구문 강조 및 자동 완성, 점프 기능 등이 매우 중요하기에 이를 위한 IntelliSense [24]를 설정하는 방법과 사용하는 방법에 대해 알아보고 추가로 디버깅 설정 및 사용법을 설명할 것이다. VSCode 환경에서의 디버깅 툴로 C++의 경우 GDB[12], Python의 경우 debugpy[13]를 사용하고 있다. ROS 커뮤니티에서는 VSCode 개발 환경을 위한 확장[14]~[16]들과 VSCode를 이용한 다양한 사용 방법[17]~[20]들을 공개하고 있기에 참고하도록 하자.

1) 설치

VSCode 설치는 하기 링크[11]에서 '.deb'의 데비안 설치 파일을 받아 설치하면 된다.

* Download Visual Studio Code

https://code.visualstudio.com/Download

2) 실행

code

3) 확장 설치

- Extensions (`Ctrl + Shift + x`)으로 이동

- 아래의 C/C++/Python/ROS/File Format/유용한 Extensions 추가

* C/C++/Python Extensions (VS Code Extensions for C++ and Python)

이름
코드명
설명
C/C++
C/C ++ IntelliSense, 디버깅 및 코드 검색
CMake
CMake 언어 지원
CMake Tools
CMake 언어 지원 및 다양한 툴
Python
린팅, 디버깅, Intellisense, 코드 서식 지정, 리팩토링, 단위 테스트 등

* ROS Extensions (VS Code Extensions for ROS, URDF, Colcon)

이름
코드명
설명
ROS
ROS 개발 지원
URDF
URDF/xacro 지원
Colcon Tasks
Colcon 명령어를 위한 VSCode Task

* File Format Extensions (VS Code Extensions for XML, YAML, Markdown)

이름
코드명
설명
XML Tools
XML, XQuery, XPath 지원
YAML
YAML 지원
Markdown All in One
Markdown 지원

* 유용한 Extensions (VS Code Extensions for Etc.)

이름
코드명
설명
Highlight Trailing White Spaces
의미 없이 사용된 공백의 스페이스 문자 강조
EOF Mark
[EOF]이 없이 끝난 파일에 [EOF] 문자 추가
Better Comments
alert, informational, TODO 등의 코멘트 강화 기능

* 기타 추천 Extensions

- ms-azuretools.vscode-docker

- ms-vscode-remote.remote-ssh

- ms-vscode-remote.remote-ssh-edit

- ms-vscode-remote.remote-containers

- ms-python.vscode-pylance

- ms-toolsai.jupyter

- dbaeumer.vscode-eslint

- uctakeoff.vscode-counter

- vscode-icons-team.vscode-icons

* 사용하고 계신 VSCode의 Extensions 중에 추천 할만한 것이 있다면 댓글로 공유 부탁드려요. ^^

4) 워크스페이스 설정

- "File" > "Add Folder to Workspace..." 메뉴 선택

- "robot_ws" 폴더 선택

5) VSCode의 개발 환경 설정

하기의 6 ~ 9과정은 VSCode의 개발 환경 설정이다. 이 설정 과정에서 settings.json / c_cpp_properties.json / tasks.json / launch.json 파일을 사용하는데 없다면 다음 위치에 생성해주도록 하자. 참고로 리눅스에서 '.' 이 접두어로 붙은 폴더 및 파일은 숨겨져 있는 폴더나 파일임을 기억하자.

~/.config/Code/User/settings.json

~/robot_ws/.vscode/c_cpp_properties.json

~/robot_ws/.vscode/tasks.json

~/robot_ws/.vscode/launch.json

6) User settings 설정

'settings.json'은 VSCode의 사용자별 글로벌 환경 설정을 지정하는 파일이다. 이 파일에 기술된 설정들은 모든 작업 공간(workspace)에서 적용된다. 예를 들어, 미니맵 사용, 세로 제한 줄 표시, 탭 사이즈 등 이다.

ROS와 관련된 설정은 아래 3가지 정도로 'ms-iot.vscode-ros'의 '"ros.distro": "humble"과 같이 ROS 버전을 지정하고, 'deitry.colcon-helper'의 '"colcon.provideTasks": true'와 같이 colcon이 지원되는 Task를 사용한다는 의미로 지정한다. 그리고 "files.associations"을 통해 확장자로 알 수 없는 *.repos, *.world, *.xacro 와 같이 ROS에서만 사용되는 파일명을 파일 형식이 무엇인지 명시해주는 설정을 하게된다.


"ros.distro": "humble",
"colcon.provideTasks": true,
"files.associations": {
  "*.repos": "yaml",
  "*.world": "xml",
  "*.xacro": "xml"
},

User settings 설정의 전문은 아래와 같다. ~/.config/Code/User/ 에 위치한 settings.json 에 다음과 같이 설정하면 된다. 물론 본인이 즐겨사용하는 설정이 있다면 함께 적어주면 된다.

settings.json

~/.config/Code/User/settings.json

{
  "cmake.configureOnOpen": false,
  "editor.minimap.enabled": false,
  "editor.mouseWheelZoom": true,
  "editor.renderControlCharacters": true,
  "editor.rulers": [100],
  "editor.tabSize": 2,
  "files.associations": {
    "*.repos": "yaml",
    "*.world": "xml",
    "*.xacro": "xml"
  },
  "files.insertFinalNewline": true,
  "files.trimTrailingWhitespace": true,
  "terminal.integrated.scrollback": 1000000,
  "workbench.iconTheme": "vscode-icons",
  "workbench.editor.pinnedTabSizing": "compact",
  "ros.distro": "humble",
  "colcon.provideTasks": true
}

7) C/C++ properties 설정

C/C++ 관련 설정이다. 현재 지정한 작업 공간 (여기서는 ~/robot_ws)의 운영체제는 무엇인지, include 폴더의 경로는 어떻게 되는지, C/C++ 규칙은 어떤 표준을 기준을 사용할지의 여부, 컴파일의 경로, intelliSense[24] 모드 등을 설정하게 된다.

c_cpp_properties.json

~/robot_ws/.vscode/c_cpp_properties.json


{
  "configurations": [
    {
      "name": "Linux",
      "includePath": [
        "${default}",
        "${workspaceFolder}/**",
        "/opt/ros/humble/include/**"
      ],
      "defines": [],
      "compilerPath": "/usr/bin/g++",
      "cStandard": "c99",
      "cppStandard": "c++14",
      "intelliSenseMode": "linux-gcc-x64"
    }
  ],
  "version": 4
}

8) Tasks 설정

VSCode에서는 외부 프로그램을 Command Line Interface (CLI) 을 통해 연동하게 하는 기능이 있는데 이를 Task [25]라고 한다. 단순한 텍스트 에디터 기능이 기본인 VSCode가 다양한 기능을 수행하고 쉽게 기능 확장을 사용할 수 있게 된 것도 이 Task 기능이 있었기 때문이다.

아래의 내용은 ROS 2에서 빌드할 때 사용되는 colcon과 관려한 build, test, clean 작업을 Task로 만들었다. 이를 통해 VScode에서 `Ctrl + Shift + b`로 빌드할 수 있고 아래와 같이 기본 설정 이외의 Task도 실행할 수 있다.

- `Ctrl + Shift + p` > Tasks: Run Task > 지정한 Task 선택

tasks.json

~/robot_ws/.vscode/tasks.json

 
{
  "version": "2.0.0",
  "tasks": [
    {
      "label": "colcon: build",
      "type": "shell",
      "command": "colcon build --cmake-args '-DCMAKE_BUILD_TYPE=Debug'",
      "problemMatcher": [],
      "group": {
        "kind": "build",
        "isDefault": true
      }
    },
    {
      "label": "colcon: test",
      "type": "shell",
      "command": "colcon test && colcon test-result"
    },
    {
      "label": "colcon: clean",
      "type": "shell",
      "command": "rm -rf build install log"

    }
  ]
}

9) Launch 설정

VSCode에서의 Launch는 'Run and Debug' (`Ctrl + Shift + d`)에서 사용되는 실행 명령어로 언어별, 디버거별로 설정이 가능하고 세부 옵션으로 Launch가 실행되기 전 즉 디버깅하기 전에 사용할 Task를 지정하거나 콘솔 기능을 설정할 수도 있다.

여기서는 ROS 2에서 많이 사용되는 Python과 C++ 언어에 맞추어 VSCode의 디버깅 툴을 지정하였다. C++의 경우 GDB[12], Python의 경우 debugpy[13]으로 설정하였고 Python의 경우 별도 빌드 없이 디버깅하도록 하였고, C++의 경우에는 GDB를 실행하기 전에 colcon build 를 수행하도록 하였다.

launch.json

~/robot_ws/.vscode/launch.json

{
  "version": "0.2.0",
  "configurations": [
    {
      "name": "Debug-rclpy(debugpy)",
      "type": "python",
      "request": "launch",
      "program": "${file}",
      "console": "integratedTerminal"
    },
    {
      "name": "Debug-rclcpp(gbd)",
      "type": "cppdbg",
      "request": "launch",
      "program": "${workspaceFolder}/install/${input:package}/lib/${input:package}/${input:node}",
      "args": [],
      "preLaunchTask": "colcon: build",
      "stopAtEntry": true,
      "cwd": "${workspaceFolder}",
      "externalConsole": false,
      "MIMode": "gdb",
      "setupCommands": [
        {
          "description": "Enable pretty-printing for gdb",
          "text": "-enable-pretty-printing",
          "ignoreFailures": true
        }
      ]
    }
  ],
  "inputs": [
    {
      "id": "package",
      "type": "promptString",
      "description": "package name",
      "default": "topic_service_action_rclcpp_example"
    },
    {
      "id": "node",
      "type": "promptString",
      "description": "node name",
      "default": "argument"
    }
  ]
}

10) 빌드

- `Ctrl + Shift + b` 단축키로 빌드를 진행할 수 있다.

11) 디버깅

- `Ctrl + Shift + d` 단축키로 빌드를 진행할 수 있다. C++, Python 과 같이 언어별로 다른데 아래의 GIF 그림과 실행 순서를 참고하여 각 언어에 맞게 디버깅해보자.

11-1) rclcpp

- Run and Debug (`Ctrl + Shift + d`)로 이동

- "Debug-rclcpp(gbd)" 선택

- "Package name" 입력 (예: topic_service_action_rclcpp_example)

- "node name" 입력 (예: argument)

- Start Debugging 클릭 (`F5`)

[그림 1: rclcpp 계열의 디버깅]

11-2) rclpy

- Run and Debug (`Ctrl + Shift + d`)로 이동

- "Debug-rclpy(debugpy)" 선택

- Start Debugging 클릭 (`F5`)

[그림 2: rclpy 계열의 디버깅]

7.2 QtCreator

1) 설치

QtCreator는 위 3번 항목에서 이미 설치하였다. 다시 한번 설치하려면 다음과 같이 설치하면 된다.

sudo apt install qtcreator


2) 실행

qtcreator

* QtCreator는 ROS 2의 RQt의 Plugin 개발에 UI 작성할 때 편리하기에 서브로 사용하면 좋을 듯싶다.

[그림 3: QtCreator의 Desing 화면]

7.3 QtCreator ROS

1) 설치

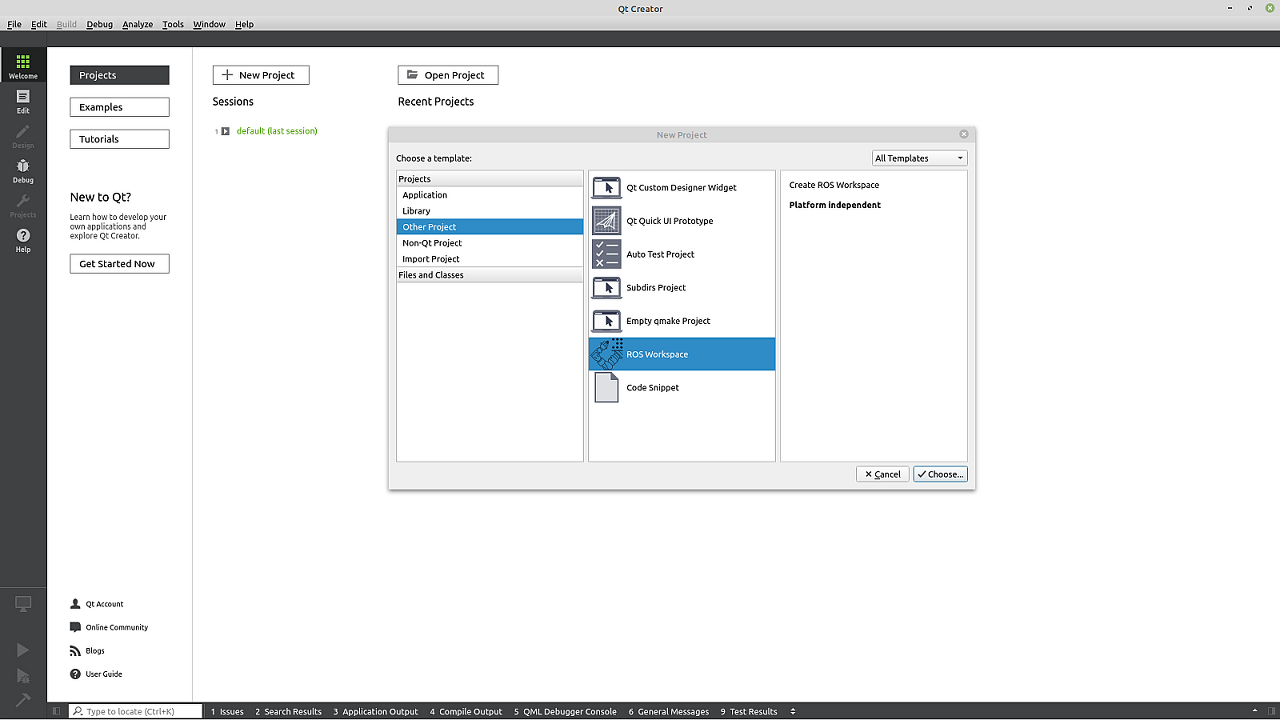
ROS Qt Creator Plug-in [22]는 ROS-Industrial [23] 컨소시엄에서 ROS의 통일된 개발 환경 구축을 위해 QtCreator의 플러그인 형태로 만든 것으로 ROS-Industrial 컨소시엄 멤버들간에 공통 개발 환경으로 사용하고 있다. 위의 일반적인 QtCreator에 ROS 개발 환경 설정을 더 편하게 해놓은 것으로 QtCreator를 기본 IDE로 사용하고자 한다면 사용해보기를 추천하고 싶다. QtCreator를 ROS 2의 IDE로 설정하려면 아래의 `Installation Instructions (Users)` 항목에서 신규 qtcreator-ros를 다운로드 받고 설정은 아래 링크의 도움말을 참고하도록 하자.

2) 실행

qtcreator-ros

[그림 4: ROS Qt Creator Plug-in]

7.4 기타

통합 개발 환경은 개발자 선호도에 따라 결정되는 것이 일반적인데 이 강좌에서 소개하지 못한 Vim, Eclipse, CLion, Emacs 등의 IDE들은 하기 링크에서 정보를 얻어 사용하도록 하자.

8. ROS 2 삭제

재설치 등의 이유로 ROS 2를 삭제하고자 한다면 하기의 명령어를 이용하여 ROS 2를 삭제할 수 있다.

sudo apt remove ros-humble-* && sudo apt autoremove

[참고 자료]

[1] 로봇 운영체제 ROS 강좌 목차: https://cafe.naver.com/openrt/24070

[2] (구) 001 ROS 2 개발 환경 구축, https://cafe.naver.com/openrt/23846

[3] 001 ROS 2 개발 환경 구축, https://cafe.naver.com/openrt/25288

[4] https://www.ros.org/reps/rep-2000.html

[5] https://linuxmint.com/download.php

[6] https://releases.ubuntu.com/20.04/

[7] https://docs.ros.org/en/foxy/Installation/Linux-Development-Setup.html

[8] https://docs.ros.org/en/foxy/Installation/Linux-Install-Binary.html

[9] https://docs.ros.org/en/foxy/Installation/Linux-Install-Debians.html

[10] https://colcon.readthedocs.io/en/released/user/installation.html#quick-directory-changes

[11] https://code.visualstudio.com/Download

[12] https://www.gnu.org/software/gdb/

[13] https://code.visualstudio.com/docs/python/debugging

[14] https://marketplace.visualstudio.com/items?itemName=ms-iot.vscode-ros

[15] https://marketplace.visualstudio.com/items?itemName=smilerobotics.urdf

[16] https://marketplace.visualstudio.com/items?itemName=deitry.colcon-helper

[17] https://github.com/athackst/vscode_ros2_workspace

[18] https://allisonthackston.com/articles/vscode-docker-ros2.html

[19] http://www.whatimade.today/ros2-helping-the-community/

[20] https://www.codetd.com/en/article/10407769

[21] https://rosindustrial.org/news/2019/7/3/new-release-ros-qt-creator-491-with-ros2-support

[22] https://ros-qtc-plugin.readthedocs.io/en/latest/

[23] https://rosindustrial.org/

[24] https://code.visualstudio.com/docs/editor/intellisense

[25] https://code.visualstudio.com/docs/editor/tasks

'자동제어 > ROS2' 카테고리의 다른 글

ROS2 13장 액션(action)  (0) 2023.04.13
ROS2 12장 서비스  (0) 2023.04.13
ROS2 11장 토픽  (0) 2023.04.12
리눅스 민트 설정  (0) 2023.04.11

+ Recent posts